🔎 Identifying Text in an Image Using the Vision framework 👀

Try out Xcode 26 in your GitHub Actions with Cirrus Runners
Enjoy the fastest Apple Silicon M4 Pro chips at a fixed monthly price — fully managed so you can focus on shipping great code. Start your free 10-day trial and get 50% off your first three months with code WWDC50.
This message is brought to you by a sponsor who helps keep this content free for everyone. If you have a moment, check them out. Your support means a lot!
Welcome to issue #54 of the iOS Coffee Break Newsletter 📬 and to the 3rd and last edition of the "Get started with Machine Learning" series.
In last week's issue, I demonstrated how simple it is to implement text translation using Apple's new Translation framework.
This time, we'll explore how to use machine learning to detect and locate text within an image by leveraging the Vision framework. The Vision framework can do much more than find text in an image. It is also capable of isolating specific areas within images, tracking objects across image sequences, detect hand and body poses and much more!
If you have worked on projects involving QR code or barcode scanning, chances are you have already made use of the Vision framework, possibly without realizing it. As for me, my first experience with Vision came when I built a Swift command-line tool to remove backgrounds from images ✂️.
Creating a Text Recognizer
Let's begin by exploring how we can use Apple's Vision machine learning framework to extract text from images.
To get started, we'll set up a text recognition component:
import Foundation
import SwiftUI
import Vision

struct TextRecognizer {
    var recognizedText = ""
    var observations: [RecognizedTextObservation] = []

    init(imageResource: ImageResource) async {
        // Create a RecognizeTextRequest.
        var request = RecognizeTextRequest()
        // Set the request's recognitionLevel to .accurate.
        request.recognitionLevel = .accurate
        // Create a UIImage using the ImageResource.
        let image = UIImage(resource: imageResource)
        // Convert the UIImage to Data.
        if let imageData = image.pngData(),
           // The perform request can fail
           // so use try? to proceed only when results are available.
           let results = try? await request.perform(on: imageData) {
            // Store the observations that are returned by the RecognizeTextRequest.
            observations = results
        }

        // Iterate through the observations
        // and get the top candidate of the potential text values.
        for observation in observations {
            let candidate = observation.topCandidates(1)
            if let observedText = candidate.first?.string {
                recognizedText += "\n\(observedText) "
            }
        }
    }
}
Here is a quick overview of what the code does:
- Import the SwiftUI and Vision frameworks.
- Create a RecognizeTextRequest, which is part of the Vision framework's tools for identifying text within images.
- Convert the UIImage to Data. This step is required because the
RecognizeTextRequestoperates on image data, not the Swift image types like UIImage. - Use the
performmethod on the text request object to analyze the image and gather results. Since this involves async processing, the initializer function must be marked async to properly await the result. - Store the observations that are returned by the RecognizeTextRequest.
- Iterate through the observations and get the top candidate of the potential text values.
- Whenever recognized text is found, we append it to the a local property.
Here is how we can integrate it into a SwiftUI view:
import SwiftUI
struct TextRecognitionView: View {
let imageResource: ImageResource
@State private var textRecognizer: TextRecognizer?
var body: some View {
List {
Section {
Image(imageResource)
.resizable()
.aspectRatio(contentMode: .fill)
.clipShape(RoundedRectangle(cornerRadius: 8))
}
.listRowBackground(Color.clear)
Section {
Text(textRecognizer?.recognizedText ?? "")
} header: {
Text("Identified text from image")
}
}
.navigationTitle("Text Recognition")
.task {
// The initializer is async
// so you need to call it from an async function or a task.
textRecognizer = await TextRecognizer(imageResource: imageResource)
}
}
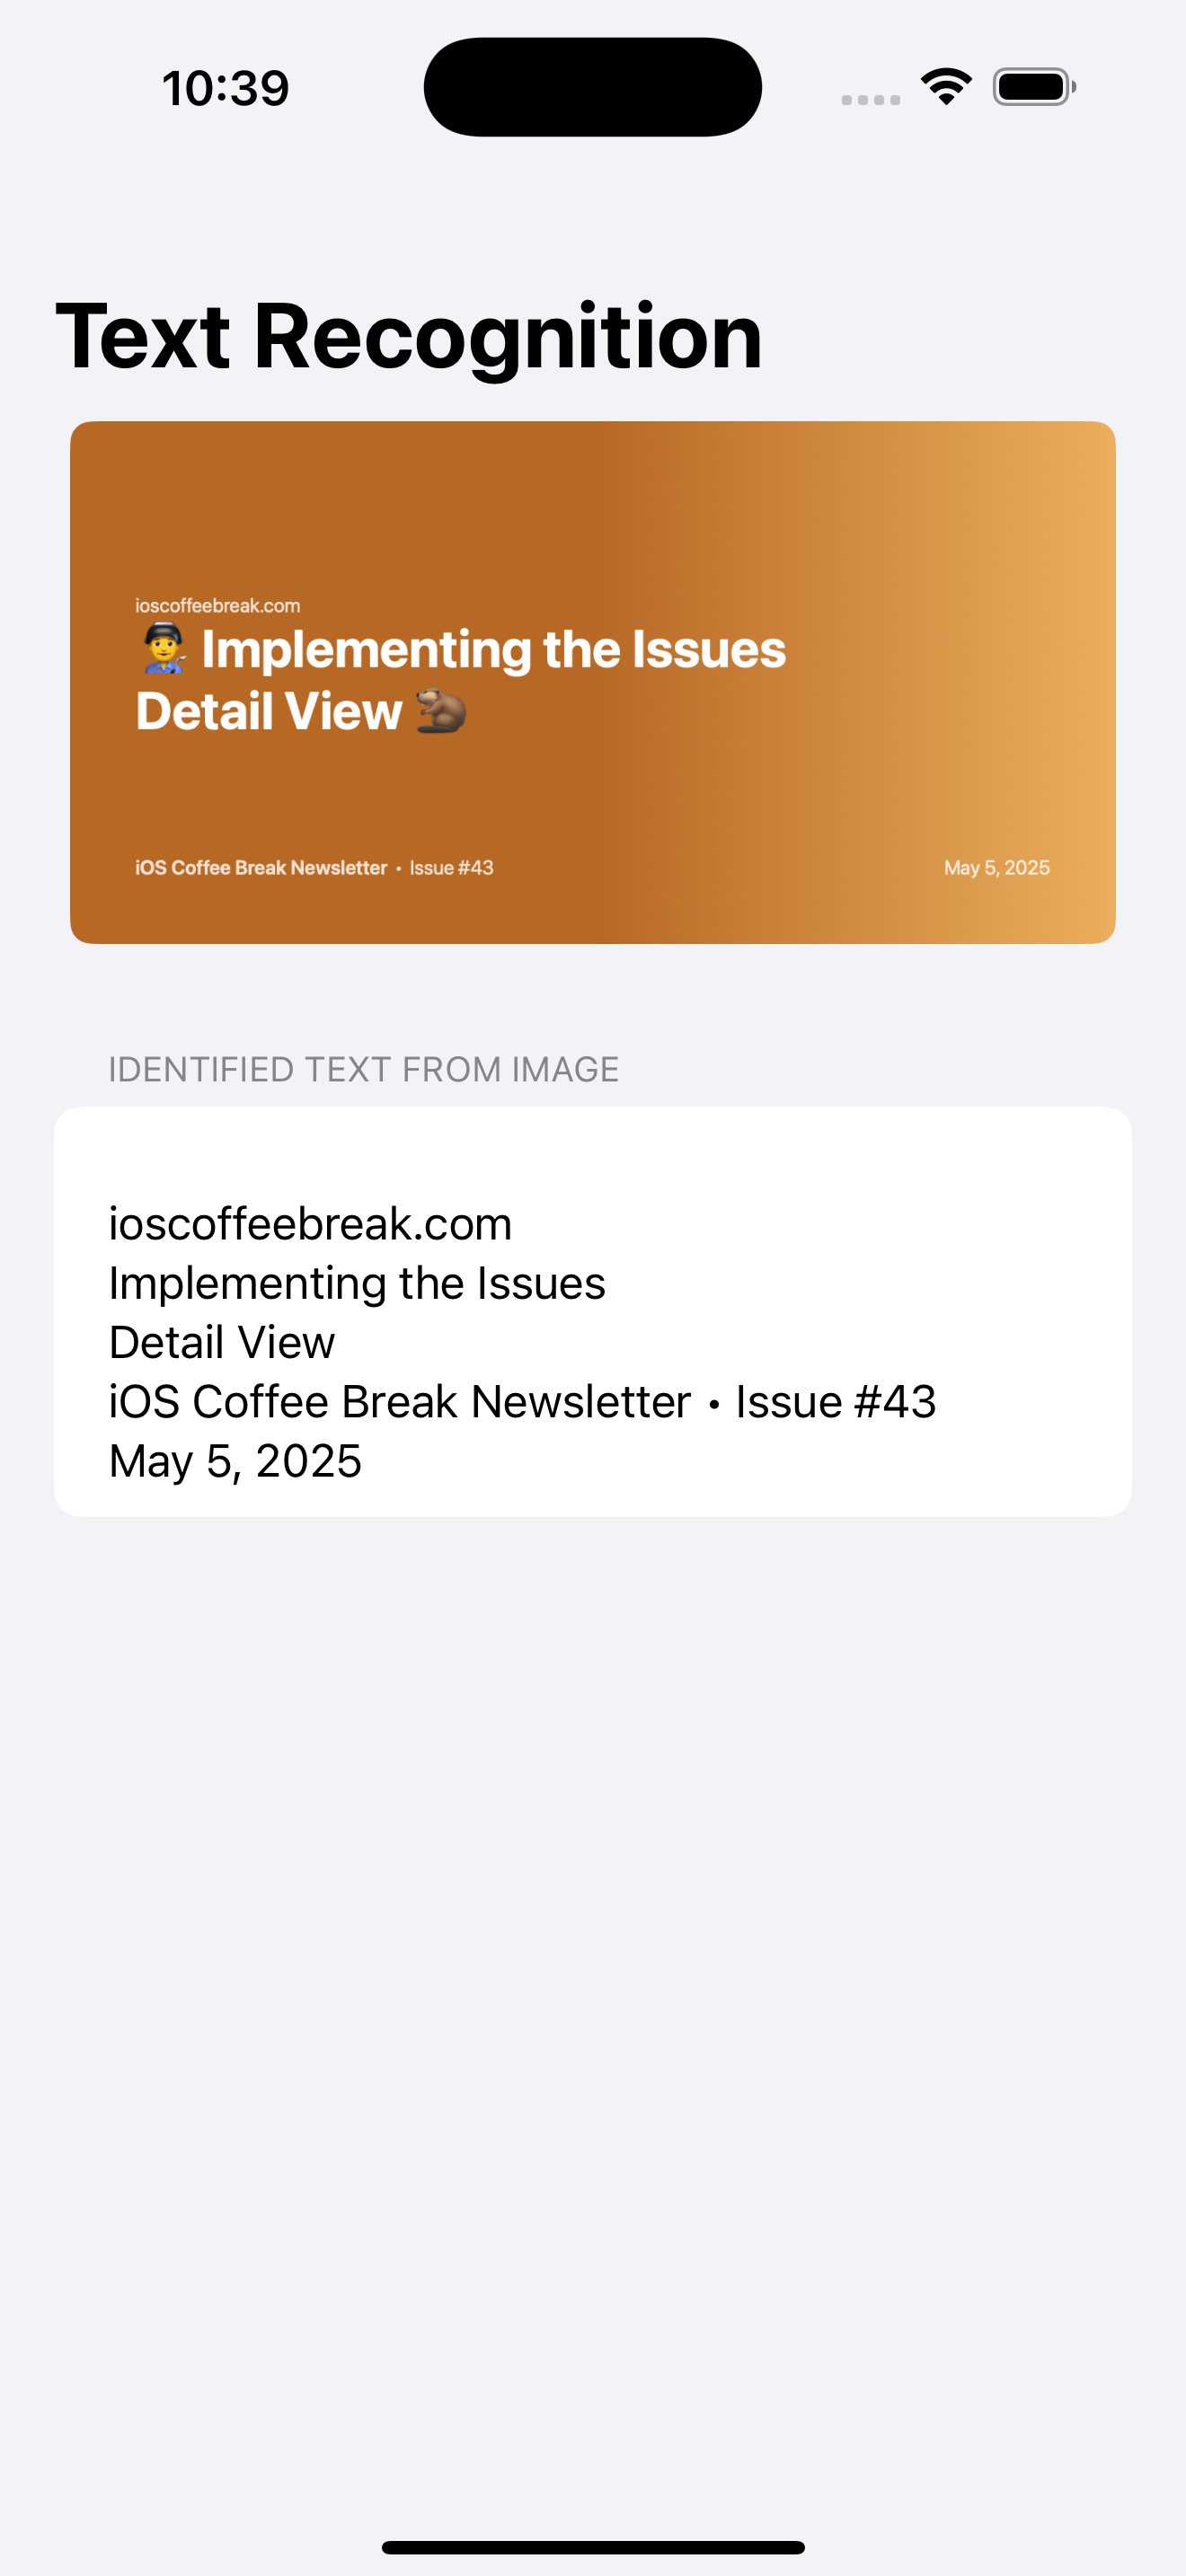
}And below is a screenshot showing the feature in action:
Highlighting Found Text
Now that we have identified text in the image, the next step is to visually highlight it by drawing rectangles around the detected text areas.
To do this, we'll start by defining a struct that represents a drawable Shape.
import Foundation
import SwiftUI
import Vision

struct BoundsRect: Shape {
    let normalizedRect: NormalizedRect

    func path(in rect: CGRect) -> Path {
        // Convert the normalized coordinates to the coordinates of the image.
        let imageCoordinatesRect = normalizedRect
            .toImageCoordinates(rect.size, origin: .upperLeft)
        return Path(imageCoordinatesRect)
    }
}
Here is a quick overview of what the code does:
- Conform to the Shape Protocol.
- Import the Vision framework and define a
NormalizedRectproperty. Each recognized text observation includes positional data indicating where the text was found within the image. - Convert the normalized coordinates to the coordinates of the image.
Then, in our SwiftUI view, we can add an overlay to the Image to draw the BoundsRect shapes around each block of identified text.
Here is how we can do it:
struct TextRecognitionView: View {
[...]
let boundingColor = Color(red: 0.31, green: 0.11, blue: 0.11)
var body: some View {
List {
Section {
Image(imageResource)
.resizable()
.aspectRatio(contentMode: .fill)
.clipShape(RoundedRectangle(cornerRadius: 8))
.overlay {
if let observations = textRecognizer?.observations {
ForEach(observations, id: \.uuid) { observation in
// Draw a BoundsRect around
// each text item observed in the image.
BoundsRect(normalizedRect: observation.boundingBox)
.stroke(boundingColor, lineWidth: 3)
}
}
}
}
[...]
}
}
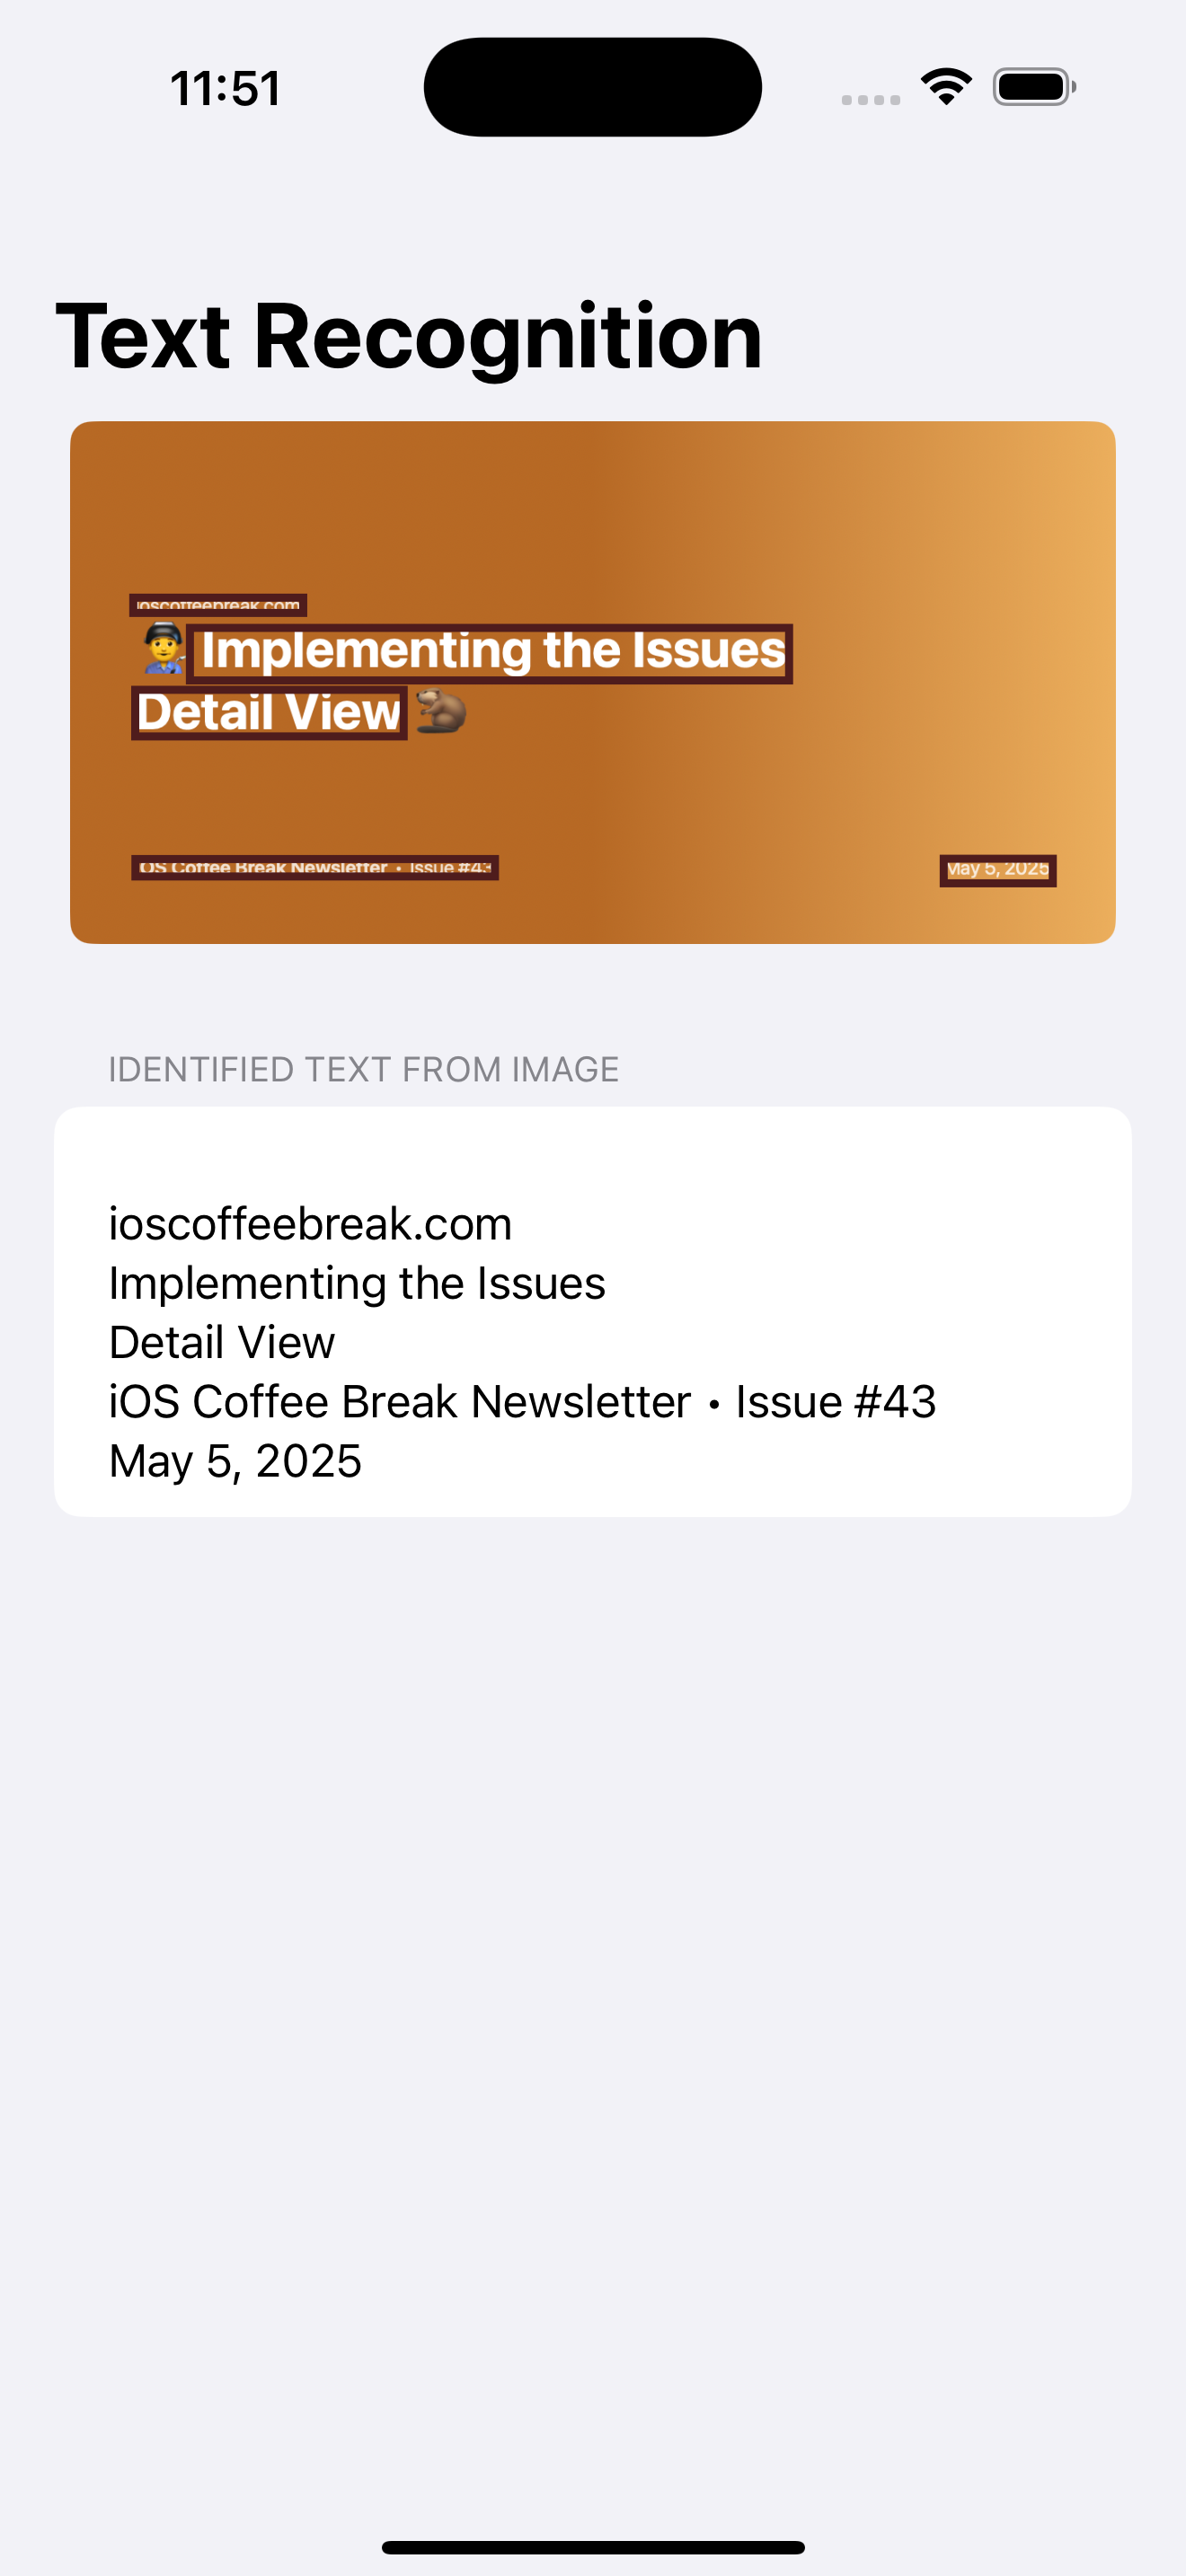
}And below is a screenshot showing the text highlighting feature in action:
🤝 Wrapping Up
The Vision framework is a powerful and versatile tool that can do much more than find text in an image. It is also capable of isolating specific areas within images, tracking objects across image sequences, detect hand and body poses and much more.
In this chapter, you have learned how to use Vision's built-in features to detect and locate text in images. This serves as a solid starting point for expanding your text recognition capabilities by incorporating more advanced functionalities.
And that wraps up the series "Get started with Machine Learning", with a high-level overview of the ML features and APIs Apple provides.
Hope you liked it 🙂
Have any feedback, suggestions, or ideas to share? Feel free to reach out to me on Twitter.