🛠 Creating a Dummy Data Generator CLI tool using Swift Package Manager 📦

Great app, no downloads?
Try WinWinKit for kicking growth of your app via affiliate & referral marketing. Set up reward systems that incentivize users to share your app with friends, while also enabling creators and influencers to promote your app for commission.
Sign up now to get 25% off.
This message is brought to you by a sponsor who helps keep this content free for everyone. If you have a moment, check them out. Your support means a lot!
Welcome to issue #57 of the iOS Coffee Break Newsletter 📬.
One recurring task I often find myself doing is generating dummy data, both in work-related and personal projects. While it is not particularly time-consuming, it is something I can automate to save a significant amount of time down the road.
So, this week, I put together a guide on building a command-line tool for generating dummy data using the Swift Package Manager. With SPM, creating CLI tools becomes much simpler, especially since we can build them directly in Swift.
The Plan
The plan is simple: implement a command line tool that generates dummy data from a Swift struct.
Here is the approach:
- CLI tool written in Swift.
- Use ArgumentParser for:
- input file:
.swiftfile with astruct. - count: number of dummy instances to generate (with a default value of 5).
- output file: path to Swift file for writing results.
- input file:
- Parsing a single struct.
- The struct fields are limited to primitive types: String, Int, Double, Bool, Date.
- No nesting or recursive generation (maybe in the future).
Creating a command-line tool using SPM
First, we need to create a Swift executable. To create a new project, run the following in your terminal:
$ mkdir SwiftDummyGen
$ cd SwiftDummyGen
$ swift package init --type executable
Running the init command sets up a new package in your current directory.
This includes generating a Package.swift file, where you can define your dependencies and additional targets, as well as a main.swift file, which serves as the primary script.
We can rename main.swift and designate it as the entry point using the @main attribute.
@main
struct SwiftDummyGen {
    static func main() {
        print("Your command line tool starts here!")
    }
}
Adding the ArgumentParser framework for reading user input
Most command-line applications need to handle input from the user via arguments, and this tool is no different. To enable argument parsing, we will include the swift-argument-parser package as a dependency.
To integrate it, simply update your Package.swift file with the necessary configuration.
import PackageDescription

let package = Package(
    name: "SwiftDummyGen",
    platforms: [
        .macOS(.v15)
    ],
    dependencies: [
        .package(url: "https://github.com/apple/swift-argument-parser", from: "1.5.0"),
        [...]
    ],
    targets: [
        .executableTarget(
            name: "SwiftDummyGen",
            dependencies: [
                .product(name: "ArgumentParser", package: "swift-argument-parser"),
                [...]
            ]
        )
    ]
)
Setting Up Property Wrappers
The SwiftDummyGen structure adopts the ParsableCommand protocol, which lets us configure the command with a brief description.
To handle user input, we use three kinds of property wrappers:
- Argument: A mandatory value the subcommand requires to run.
- Option: An optional input that can be provided by the user.
- Flag: A toggle that influences how the command behaves.
@main
struct SwiftDummyGen: ParsableCommand {
    @Argument(help: "The input Swift file with the struct definition.")
    var input: String

    @Option(name: .shortAndLong, help: "The number of dummy elements to generate.")
    var count: Int = 5

    @Option(name: .shortAndLong, help: "Writes the output to a Swift file rather than to standard output.")
    var output: String?

    static var configuration: CommandConfiguration {
        CommandConfiguration(
            commandName: "SwiftDummyGen",
            abstract: "Generates dummy data from your Swift structs."
        )
    }

    func run() throws {
        [...]

        if let output = output {
            try outputString.write(toFile: output, atomically: true, encoding: .utf8)
            print("✅ Generated dummy data written to \(output).")
        } else {
            print("\n\(outputString) \n\n✅ Generated dummy data written to standard output.")
        }
    }
}
I have intentionally skipped over the implementation specifics, as the goal here is to outline the essential steps for creating a Swift-based CLI tool.
Using Our Swift CLI Tool
At this point, we can start using our command-line tool and see what it does.
$ swift run SwiftDummyGen --help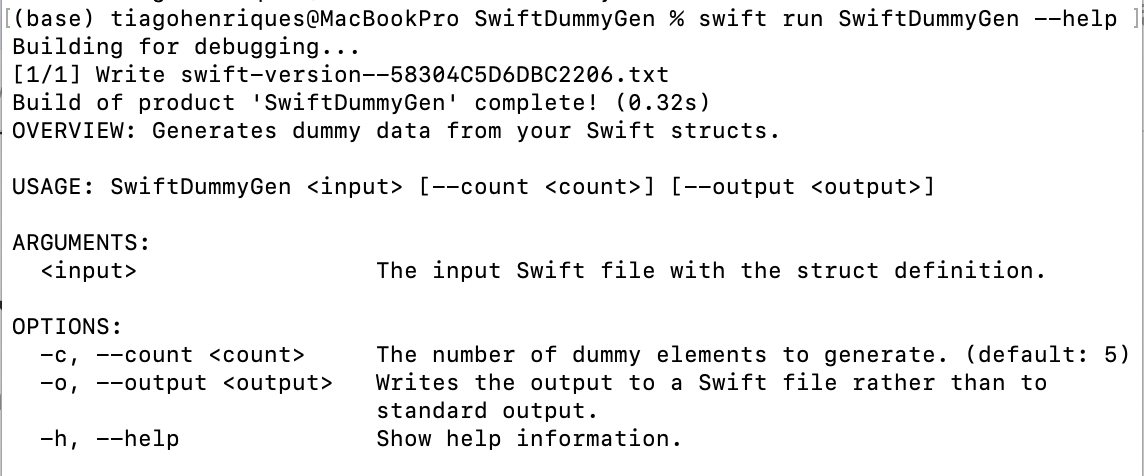
One of the advantages of using the ArgumentParser framework is that it handles much of the heavy lifting for us. It automatically creates descriptive output similar to what we would expect from other CLI utilities. It also includes a built-in help flag, which is a standard feature in most command-line applications.
🧪 Example Usage
Say our input file is input.swift which contains the definition of a struct named Issue:
struct Issue {
    var id: String
    var content: String
    var url: String
    var title: String
    var summary: String
    var date: Date
}
Running the tool
Our command-line tool is ready to be used. Just run the following command in your terminal:
$ swift run SwiftDummyGen input.swift --count 2 --output output.swiftThis generates 2 dummy issues instances and writes them to output.swift.
// Auto-generated by SwiftDummyGen.
import Foundation

struct Issue {
    var id: String
    var content: String
    var url: String
    var title: String
    var summary: String
    var date: Date
}

let dummyIssueData: [Issue] = [
    Issue(
        id: "Sample 345",
        content: "Sample 745",
        url: "Sample 692",
        title: "Sample 871",
        summary: "Sample 579",
        date: Date(timeIntervalSinceNow: 2776)
    ),
    Issue(
        id: "Sample 310",
        content: "Sample 362",
        url: "Sample 213",
        title: "Sample 309",
        summary: "Sample 18",
        date: Date(timeIntervalSinceNow: -221)
    )
]
The output property is optional. If it not passed, our tool will print out the results in the terminal.
Compiling as Executable
To turn your target into an executable, use the build command:
$ swift buildOnce we have set up our command-line tool, the next step is to compile it for actual use.
We can achieve this by building it in release mode using the -c release flag.
This will generate an executable located in the .build/release directory.
$ swift build -c releaseIf you are curious about the exact path of the compiled binary, here is how you can find it:
$ swift build -c release --show-bin-pathTo actually make use of it, we need to copy it over into the /usr/local/bin folder.
Here is how we can do it:
$ cp -f .build/release/SwiftDummyGen /usr/local/bin/SwiftDummyGenThat should be enough to make our CLI tool available as a real tool!
We can now run SwiftDummyGen using your CLI tool from within any folder from the terminal! 🥳
$ SwiftDummyGen input.swift --count 2 --output output.swift🤝 Wrapping Up
We have successfully built our own command-line tool using the Swift Package Manager. Thanks to the ArgumentParser framework, handling input arguments becomes straightforward. Once we compile a release version, the tool is ready to use wherever we need it!
Looking ahead, I plan to go further and support things like:
- Support for optional and array types (like String? and [Int])
- Add more randomization features (such as generating more realistic names)
- Add more advanced randomization (e.g. realistic names)
- Use all struct types (nested/custom)
Hope you liked it 🙂
Have any feedback, suggestions, or ideas to share? Feel free to reach out to me on Twitter.